
Proper Assembly Method for Compression Fittings
Tube fittings are designed to provide a leak tight seal for pressures up to the suggested maximum allowable pressure rating of the tubing. In this article, we focus on how to assemble Double Ferrule tube fittings sizes 1 inch and under.
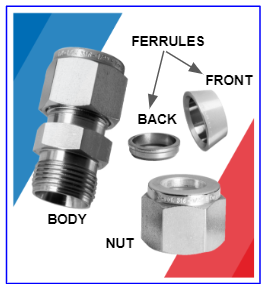
The Fitting
A Double Ferrule Tube Fitting consists of four (4) parts: Body, nut, front ferrule and back ferrule.
Depending on the manufacturer, most tube fittings will arrive completely assembled, finger-tight and ready for immediate use. Therefore we do not recommend dissembling the tube fitting prior to installation. Disassembling can allow dirt or other foreign materials to enter the fitting and can interfere with the seal.

Tube Preparation
It’s important that the tube has been prepared properly prior to assembly. Use caution to avoid using any tube with visible scratches or deformities on the outside diameter.
Using a tube cutter, cut the tubing to length (unless you are installing the fitting on an existing length of tube). Once the tube is cut, remove any burrs that may have been created during the cutting process. Burrs or sharp edges on the OD or the ID of the tube may jeopardize the integrity of the connection.
Tube Fitting Assembly
1. Insert the tube
Insert the tube into the fitting snugly against the shoulder and rotate the nut finger tight.

2. Mark the nut
Using a marker, place a small mark on the nut at the 6 o’clock position. Marking the nut will let you know where the starting and ending positions are for reference.

3. Tighten the nut
While holding the fitting body steady, tighten the nut 1-1/4 turns until you’ve reached the 9 o’clock position. This turn is necessary to achieve a full surface contact between the front ferrule and the body to maximize the grip of the rear ferrule.
Note: For 1/16”, 1/8” and 3/16” and 2, 3 and 4mm tube fittings, tighten the nut only a 3/4 turn to the 3 o’clock position.

4. Inspect the gap
Use a gap inspection tool to ensure the fitting has been properly tightened. To use the tool, position it next to the gap between the nut and the body. If the gage will not enter the gap, the fitting has been properly tightened.
If the gage does enter the gap, you will have to tighten the fitting again. Only tighten the fitting in 1/8 turn increments until the gage no longer enters the gap.

If you have any questions, feel free to send us an inquiry online or call us at 1-800-234-3033 and we will make sure to get back to you as soon as possible.